How to Help Your Child with Gagging: Tips and Techniques
If your child is gagging when they eat, don’t worry! You are not alone. This is a common issue that many parents face. And while it can be anxiety-inducing, it doesn’t have to be an immediate cause for concern because gagging can be caused by a number of things. If you find yourself worrying often about feeding your child safely, hopefully reading this article will calm your fears.
How to Help Your Child with Gagging: Tips and Techniques

By: Abbie Gacke M.A. CCC-SLP, CLC
If your child is gagging when they eat, don’t worry! You are not alone. This is a common issue that many parents face. And while it can be anxiety-inducing, it doesn’t have to be an immediate cause for concern because gagging can be caused by a number of things. If you find yourself worrying often about feeding your child safely, hopefully reading this article will calm your fears.
Believe it or not, gagging is actually a very common part of feeding when starting your baby on solids. Here are some things to remember about gagging during mealtimes:
- Gagging is a protective reflex that helps babies push food (or objects) forward if anything gets too close to blocking their airway. So, it’s a helpful reflex during those early feeding experiences because it decreases your baby’s risk of choking.
- This gag reflex will move further back in your baby’s mouth during their first year of life, and it will become less sensitive as your baby has more positive sensory experiences in their mouth. Providing positive oral experiences (with teethers, oral probes, oral massage, etc.) early on can help decrease gag sensitivity.
- Gagging will occur more often in the first few months of starting solids (around 6-8 months), but gagging should NOT happen with all foods or cause your baby to become extremely distressed. If gagging is happening with meat, for example, it might make sense to adapt your food presentations to their skill level (e.g., tenderize the meat more, cut it into long strips, use a dip to moisten the meat, etc.).
- When your child does gag, remain calm and provide positive narration (e.g., “Keep chewing, you’re doing great!” and “It’s okay, that was a big piece!”). Don’t offer the next bite until your baby has recovered and is showing signs they are ready to continue with mealtime.
- The frequency of gagging should decrease throughout the first year of life with positive eating experiences. If your baby demonstrates continuous distress with eating, seek out a knowledgeable feeding specialist (SLP, OT) or discuss your concerns with your child’s pediatrician.
Choking and gagging are very different, and it’s important to know the difference so you know what’s “normal” versus when you should intervene. Here’s how to identify when your baby is gagging, which is expected, versus when they are choking:
Choking is a life-threatening event when a foreign object becomes lodged in the airway causing a blockage of airflow. This may require immediate intervention if your:
- Child’s face changes color with bluish coloring around lips
- Child has a panicked look on their face with wide eyes
- Child does not make any sounds
Gagging is a protective mechanism that causes the child to protrude the tongue quickly forward and expel any food nearing the airway. It should resolve quickly and may look like:
- Surprised facial expression with an open-mouth posture
- Possible eye watering
- Minimal to no color change in the face
- Audible coughing, gurgling, or retching sounds as food comes forward
Knowing how to respond to an accident or medical emergency related to feeding will help you feel more prepared when starting solids with your child. With this in mind, it’s important to always be alert, mindful, and positive during mealtimes, and being CPR- and First Aid-trained can give you an extra boost of confidence. Here are some other ways to make difficult foods safer when your baby is first starting solids:
- Grapes and cherry tomatoes: Cut into quarters and remove skin if your child is really having difficulty managing middle-texture skin.
- Small berries or veggies like blueberries, raspberries, peas, or edamame: Pre-smash when presenting to the child so the food is easier to start chewing.
- Nuts like peanuts, almonds, or cashews: Avoid offering these in whole form until your baby is at least 2 years old. If offered before age 2, pulverize into dust-like consistency and add to yogurt, applesauce, ice cream, etc.
- Hotdogs and meat sticks: Avoid offering these in whole form until your baby is at least 2 years old. Otherwise, cut them into small quarter-sized pieces and remove the skin.
- Fish with bones: Remove the bones when self-filleting salmon, bass, Northern pike, etc. or serve pre-packaged fish without bones.
- Nut butters: Don’t offer nut butters in large gobs. Add water or milk to thin out the consistency and decrease the “stickiness.”
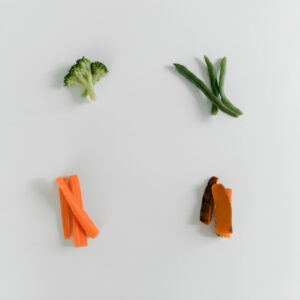
- Large pieces of raw vegetables: Steam the vegetables to soften them and make it easier for your child to chew and swallow them safely.
- Hard candy: Don’t offer these in whole form until your baby is at least 2 years old. Otherwise, pulverize into dust-like consistency to add to yogurt, ice cream, cake, etc.
Thank you, Abbie Gacke M.A. CCC-SLP, CLC for writing this article! You can find her on Instagram for more feeding tips, tricks, and real-life examples for supporting your baby’s feeding development.
Hungry for more? If you have a baby 3 months or older, take our Feeding your Baby Solids Course! It covers the most important feeding topics and answers questions you didn’t even know you had. The best part is that it’s all broken down into short, easy-to-understand videos for you to watch on your own time and at your own pace, even while doing the dishes. It will help you THRIVE when feeding your little one, we promise! For babies 3+ months old.